Set up your title
To configure your course properly, right click on your title level in the Title Explorer, choose Properties, choose the Content tab, then select the option for an AICC/SCORM/CourseMill (3.x and above) Published Title. You now have access to the AICC variables and the assignable unit.
Set the SCORM/AICC-required Lesson Status
To be SCORM compliant and to send the proper data to CourseMIll, you will either need to have a test which will pass a completion status at the end, or you will need to set the lesson status elsewhere, generally via an action on the last page of your course (or the page that you want to tell the LMS that the course status has changed).
-
When using SCORM, once you set the lesson status, no new information will be saved to the LMS. So make sure you choose the proper location in your course to set the lesson status. It will have to be after any test or survey that will report to CourseMill. Fortunately, in CourseMill 6.5 or higher, you have the option (Manage Properties > RetainHighestScore) to override this issue with SCORM. Setting this option to No will allow CourseMill to retain ALL scores passed from the course, but still no interactions after the lesson status.
We recommend you guarantee that the user will see the page in which you are setting the lesson status.
-
You could place the setting of the lesson status on the pass or fail page of a test.
-
If you have a survey that is positioned after the test and you want that survey to report information to CourseMill, make sure you let your users know that the survey is a requirement. Place the setting of the lesson status on the page the users will land after they have completed the survey.
-
If you do not have a test or survey, place this on the Thank you for taking this course page.
-
-
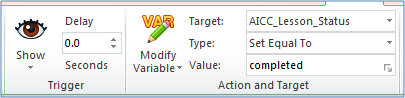
Set the action on the page as follows:
On: Show
Action: Modify Variable
Target: AICC_Lesson_Status
Value: "completed" (without the quotes). Make sure you use lower-case letters. Leave everything else at defautls.
Set up scoring the test
-
Check your Test Properties > Results tab to make sure Grade the Test, Include test score in overall score, and Lowest passing score are enabled.
-
Create a Submit/Done button (only if test is not randomized).
-
Make sure Submit/Done button only has Submit/Process Test/Survey on it and nothing else.
-
Make sure this button is only visible on the last page of the test.
-
Make sure the last page of the test does not have a Next button.
-
Create an Exit button
You need an Exit button in your title to make it SCORM compliant. Complete the following steps for one of two options:
-
If you have an image that you would like to use as an Exit button:
-
You will just need to add it as an image in your title.
-
Select your image in the Title Explorer and choose the drop-down menu Add > Action.
-
Fill in these properties: On: Mouse Click, Action: Exit Title/Close Window
-
-
If you do not have an Exit button:
-
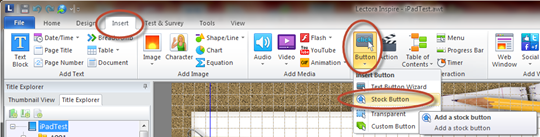
Select the drop-down Tools > Button Wizard.
-
Choose Stock Button from Clipart.
-
Choose your color and Exit button.
-
Move the Exit button to the desired location.
-
Assignable Unit Properties (AKA the Brown Brief Case)
In the Assignable Unit Properties > Assignable Unit Properties tab, make sure that your Mastery Score matches your Lowest Passing Score (in the Test Properties > Results tab).
Set up your Lectora to work with your CourseMill
-
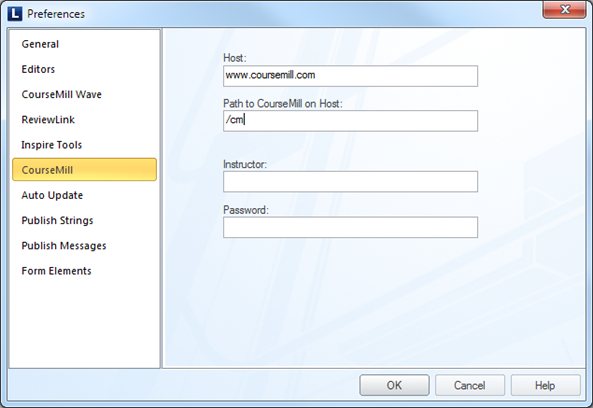
Select Preferences from the File menu. In the Preferences dialog box, click the CourseMill tab.
-
In the CourseMill Host field, specify the Web address of the CourseMill server. By default, this value is http://www.coursemill.com.
-
In the Path to CourseMill on Host field, specify the location on the CourseMill server where the CourseMill system resides. By default, this value is set to /cm6. If the CourseMill system was installed with the default settings, enter /cm6 in this field.
-
Click OK.
Here are some examples of URLs for a CourseMIll site and how your two fields should be set up:
| URL | Host Field | Path to CM |
|---|---|---|
| http://299.278.44.110/cm6/cm0671/home.html# | 299.278.44.110 |
/cm6 |
| https://compliancetrng.trivantis.com/cm6/home.html# | Compliancetrng.trivantis.com |
/cm6 |

Set up your CourseMill course to have an instructor
When you publish directly to CourseMIll you will need to fill out the three fields listed on the below dialog:

The Course ID, Instructor ID, and Password need to match what you have in CourseMill. (See Managing Courses for how to add or edit a course to include the proper instructor). If it does not find a matching course in CourseMill you will get an error. You can also key in an administrator’s ID and password.
Set up test/survey interactions
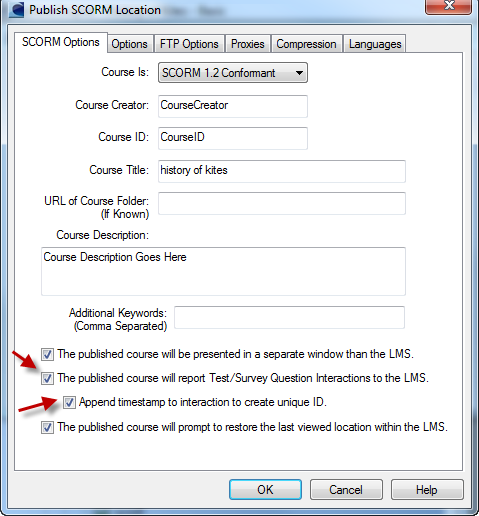
Be sure all four items as shown in the above dialog are checked.
For the check box The published course will report Test/Survey Question Interactions to the LMS, an example of an answer might be “A. CourseMill is the best LMS in the industry.”
The table below shows how that answer will be stored in CourseMill, depending on the Publish method you selected:
|
Publish to SCORM |
Publish to CourseMill |
|---|---|
|
A |
A. CourseMill is the best LMS in the industry.” |
Also if the course description is filled out (other than Course Description Goes here), when it is uploaded into CourseMill using either method, it will override the course description in CourseMill.
Use JavaScript Title Manager
In the Options tab, we recommend that you check the Use JavaScript Title Manager (as shown below). This selection allows your content to use JavaScript instead of Java. JavaScript is much easier for you to troubleshoot and does not rely on a browser plug-in. This also makes your published course more consistent.

Publishing from Lectora 11 and Lectora 12
Follow these steps to publish from Lectora 11 and Lectora 12 to CourseMill:
-
Design Your Title
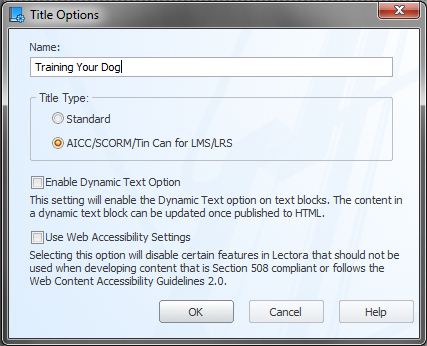
For your title to be in compliance with AICC, SCORM, or Tin Can standards, be sure your Title Type in the Title Options has AICC/SCORM/Tin Can for LMS/LRS selected.
-
Set the SCORM/AICC-required Lesson Status
To be SCORM compliant and to send the proper data to CourseMIll, you will either need to have a test which will pass a completion status at the end, or you will need to set the lesson status elsewhere, generally via an action on the last page of your course (or the page that you want to tell the LMS that the course status has changed).
-
When using SCORM, once you set the lesson status, no new information will be saved to the LMS. So make sure you choose the proper location in your course to set the lesson status. It will have to be after any test or survey that will report to CourseMill. Fortunately, in CourseMill 6.5 or higher, you have the option (Manage Properties > RetainHighestScore) to override this issue with SCORM. Setting this option to No will allow CourseMill to retain ALL scores passed from the course, but still no interactions after the lesson status.
We recommend you guarantee that the user will see the page in which you are setting the lesson status.
-
You could place the setting of the lesson status on the pass or fail page of a test.
-
If you have a survey that is positioned after the test and you want that survey to report information to CourseMill, make sure you let your users know that the survey is a requirement. Place the setting of the lesson status on the page the users will land after they have completed the survey.
-
If you do not have a test or survey, place this on the “Thank you for taking this course” page.
-
-
Set the action on the page as follows:
On: Show
Action: Modify Variable
Target: AICC_Lesson_Status
Value: "completed" (without the quotes). Make sure you use lower-case letters. Leave everything else at defaults.

The Mastery Score will automatically set the Completion status if the student scores above it. For example, if the user has one test with the passing score set at 80% and the mastery score set at 80%, the completion status will be set automatically as long as the student scores 80% or above, without the need to modify the AICC_Lesson_Status variable.
If the user has two or more tests and each test has the Include Test Score in Overall Score selected, the course will average these grades out. In this case, if the user scores a 90% on one test and a 70% on the other test, the average score being an 80% will also set the course to be completed, assuming the mastery score is set to 80%. Note that if the Include Test Score in Overall Score check box is not selected, that test score will not be averaged in the overall grade.
-
-
Set up scoring the test
-
With the test selected in Title Explorer, click the Results tab to make sure Grade the Test, Include test score in overall score, and Lowest passing score are enabled.
-
Create a Submit/Done button (only if test is not randomized).
-
Make sure Submit/Done button only has Submit/Process Test/Survey” on it and nothing else.
-
Make sure this button is only visible on the last page of the test.
-
Make sure the last page of the test does not have a Next button.
When the Process Test/Survey action fires, the test will be graded at that moment and the score along with the interaction data (if checked when publishing) will be sent to CourseMill and the navigation (as set in the Test Behavior ribbon) will then occur based on whether the user passed or failed the test. -
-
-
Create an Exit button
You need an Exit button in your title to make it SCORM compliant. Complete the following steps for one of two options:
-
Using a custom button
Using Lectora 11:
-
On the Insert tab, open the list under Button and select Custom Button.

-
From the Add Custom Button pop-up window, you only need to select the image for the Normal state of the button (the other two states are not necessary for the button to work).

-
Move the button to the desired location.
Using Lectora 12:
-
On the Insert tab, open the list under Button and select Image Button.

-
From the Add Image Button pop-up window, you only need to select the image for the Normal state of the button (the other two states are not necessary for the button to work).

-
Move the button to the desired location.
-
-
If you do not have an Exit button and want to retrieve one from the stock of buttons:
-
From the Insert tab, select the list from the Button icon.
-
Select Stock Button.
-
Choose your color and Exit button.
-
Move the Exit button to the desired location.
You can also create the button using the Button Wizard if you are using Lectora 11 or as a simple text button if you are using Lectora 12.
-
Using Lectora 11:
Open the list under Button and select Text Button Wizard:
If you prefer to use an image for your button, you can place in the image and then cover it up with a transparent button (Insert > Button > Transparent).] -
Using Lectora 12:
Select the list under Button and select Text Button:

-
-
-
Assignable Unit Properties (AKA the Brown Brief Case)
In the Assignable Unit Properties > Assignable Unit Properties tab, make sure that your Mastery Score matches your Lowest Passing Score (in the Test Properties > Results tab) if you have only one test. If you have multiple tests, change the mastery score to be what you want your averaged score to be. Refer to Step 2 for more information
-
Set up your Lectora to work with your CourseMill
-
Select Lectora Preferences from the File menu. In the Preferences dialog box, click the CourseMill tab.
-
In the Host field, specify the Web address of the CourseMill server. By default, this value is www.coursemill.com.
-
In the Path to CourseMill on Host field, specify the location on the CourseMill server where the CourseMill system resides. By default, this value is set to /cm6. If the CourseMill system was installed with the default settings, enter /cm6 in this field.
-
Click OK to save your changes.
Here are some examples of URLs for a CourseMill site and how your two fields below should be set up:
URL Host Field Path to CM http://299.278.44.110/cm6/cm0671/home.html# 299.278.44.110 /cm6
https://compliancetrng.trivantis.com/cm6/home.html# Compliancetrng.trivantis.com /cm6
-
Using Lectora 11:

-
Using Lectora 12:
-
-
Set up your CourseMill course to have an instructor
When you publish directly to CourseMIll you will need to fill out the three fields listed on the below screen capture:

The Course ID, Instructor ID, and Password need to match what you have in CourseMill. (See Managing Courses for how to add or edit a course to include the proper instructor). If it does not find a matching course in CourseMill you will get an error. You can also use an administrator’s ID and password.
-
Set up test/survey interactions
-
Using Lectora 11:

-
Using Lectora 12:
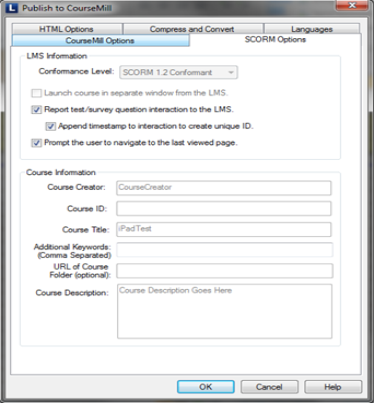
For the check box The published course will report Test/Survey question interactions to the LMS, an example of an answer might be A. CourseMill is the best LMS in the industry.
The table below shows how that answer will be stored in CourseMill, depending on the Publish method you selected:
Publish to SCORM
Publish to CourseMill
A
A. CourseMill is the best LMS in the industry.
Also if the Course Description is filled out (Other than Course Description Goes here), when it is uploaded into CourseMill using either method, it will override the course description in CourseMill.
-