
One of the very first steps you will need to do is set up your organization. Everything you set up from that point on is dependent on the organization you are working with. So it is very important to understand the meaning of an organization in CourseMill and how you work within it. All of your users can be categorized into one or more independent organizations which simply represent an independent group of users within your company.
The organizations that you set up will define a particular group of users within your company that you would like to provide training for – specific to that organization. For example, if training will be set up differently for Sales as opposed to Manufacturing, then you would want to set up those organizations independent from each other. Each of those organizations would have their own set of courses, their own instructors, and maybe their own CourseMill administrators.
How you set up your organizations from the beginning is very important. Start by asking yourself these questions:
Are we setting up training for third parties? For example: different customers who have different needs? or different types of agencies? Or different types of users regulated in different ways?
Will your company require any security restrictions between different parts of the company? Or will you allow every student in your company to see everything on the site?
Will the company need several administrators to handle the volume of users and special requests?
Do different parts of the company want to have their own News section addressing their specific users?
Will one part of the organization be able to allow students to self-register? While another part mirror its users with a HRIS or ERP system?
Will you have courses that need to span multiple organizations? If so, each course will need to be loaded into each organization with a unique name.
Will only certain students be allowed community board access (chat/discussion boards)?
If you answered yes to any of these questions you will most likely want to set up more than one organization.
There is a way to further define an organization by using the definition of Sub-Orgs (later described in this document). However numerous configurations relating to the questions above can be set up on the organization level only. Later in this document we explain how you set these up.
Let’s review some examples of companies that set up various numbers of Organizations and why they set them up that way.
Businesses with only a small number of users in their CourseMill system will typically set up only one overall Organization. For example, ACME Call-A-Nurse is a small company that dispatches nurses to people’s homes for medical assistance. Being in the Healthcare business, they do require each nurse to continually take training and become certified in order to pass government regulations. They have approximately 200 nurses in the field that will be expected to take online training through CourseMill.
Their Organization will be called CallaNurse and there will be one administrator handling all the course and user input. Everyone that is set up by the administrator as a student will have access to all courses in the catalog and will be able to chat with anyone else in that course. The administrator will easily be able to send mass emails out to all students registered in the Organization, announcing a new course.
They do have various levels of nurses (STNA, LPN’s, RNs, etc) which may require different levels of training. These nurses are assigned to serve in different parts of the city. The use of Sub-Orgs (further defined in this document) could further define these factors for reporting/enrolling.
Businesses that have a medium amount of users in their CourseMill system may set up several organizations. ACME Family Safe is a medium business that has several divisions. One division is similar to ACME Call-A-Nurse where it employs 1200 nurses in a 5 state region that are dispatched out to the field. Another division carries products that are used for home safety – like security systems, pill dispensers, and health monitoring equipment. This division has 500 sales people across all 50 states. And a third Division is re-modeling division that provides construction service for home remodeling (putting in elevators, etc). This division has 100 full-time employees and many times 2000 contractors on payroll at any one point in time.
Each division is run totally different with different levels of required certifications. The manager of each division wants to set up and run the administration in their own way, have their own news, and create various types of reporting.
In this case they have set up 3 Organizations: FS-Nurse, FS-Safety, and FS-Home.
Businesses that will have a large amount of users in their CourseMill system may set up a large amount of organizations. ACME Healthy Advisors is a service company that provides training to 10,000 customers worldwide across various topics. Each customer will have its own particular training needs and each customer will be in charge of managing its own student database. Some customers will be charging for courses that students take and others will not.
Since each customer may have their own requirements, ACME Healthy Advisors is setting up a unique Organization for each customer. Therefore ACME Advisors will have one overall administrator, but then each customer will have their own Administrator managing their own courses and requests.
Once you set up your Organization(s), you now may want to further break that organization down to allow an administrator or instructor to mass-enroll all students in a particular part of that Organization. Or when you create reports, you may only want to report on a particular part of your Organization.
In CourseMill, an Organization can be categorized into 16 different categories (Sub-Org 0 through Sub-Org 15). The diagram below shows an Organization further broken down into 2 sub-categories: Department and Team.
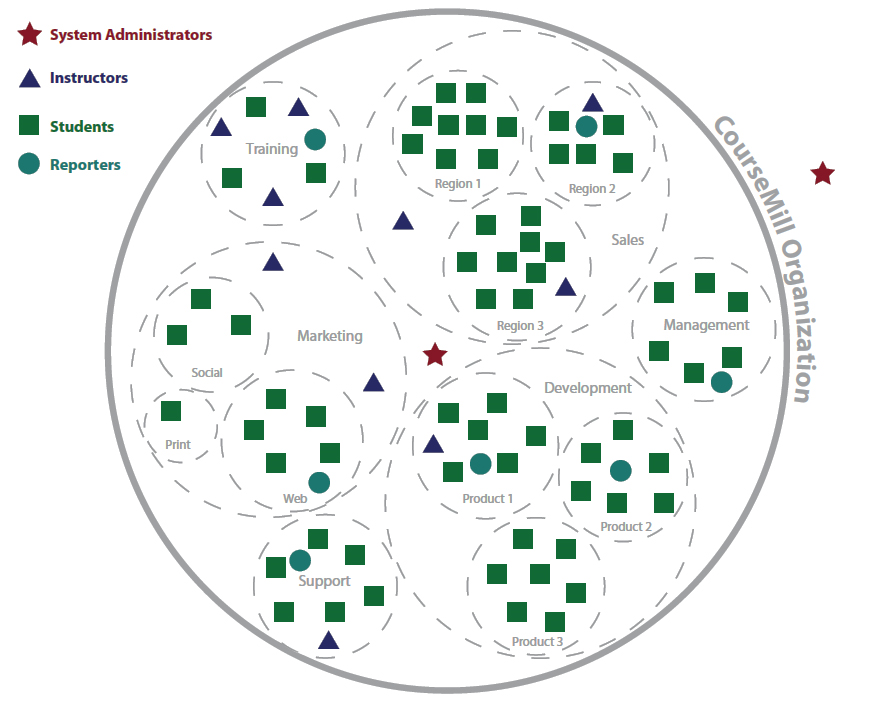
This diagram also shows the 4 types of users (administrators, instructors, reporters, and students) that will be defined in organization.
Refer to User Role Definitions to gain more insight into this topic.
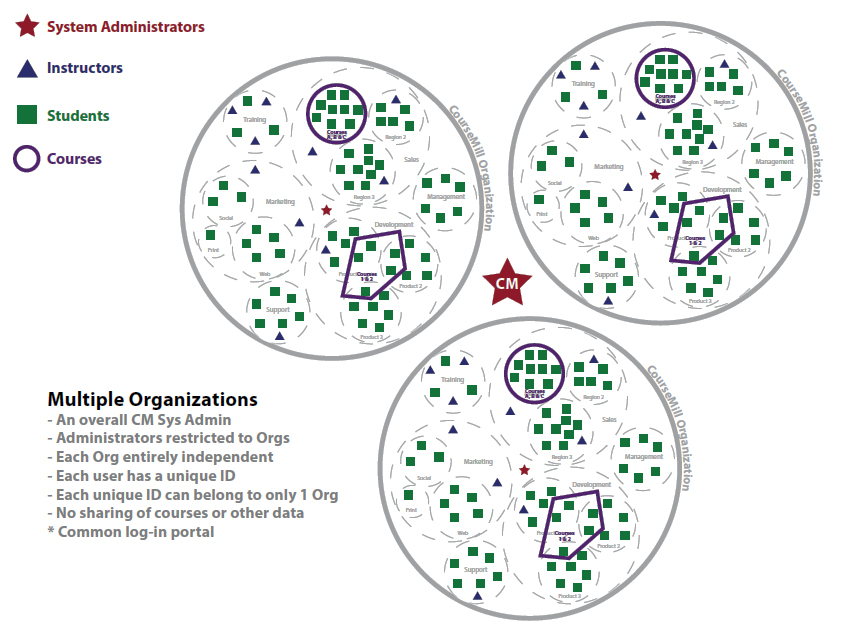
When you have multiple organizations within your CourseMill system, you may have a user that needs to have access to numerous organizations. CourseMill’s rule is that each user’s unique ID can belong to only one organization. If a user within the system needs to have access to more than one organization, you can create multiple User IDs for that user. Ex: JohnDoe-Sales and JohnDoe-Training.
User names have to be unique within the entire CourseMill site.
For example, a UserID of “Tom.Jones”, in one organization could be “Tom.Jones1”, in another organization.
All reporting within an organization is only pulling data for that organization. Reports cannot include data from multiple organizations (unless you are a global administrator).
Course IDs have to be unique within the entire CourseMill site.
For example, a CourseID of “Acctg101”, in one organization could be “Acctg101A”, in another organization.
Each unique organization can be configured in a completely different way than the others.
Each unique organization can have its own set of curriculums, courses, sessions, logo for branding, and News page.
There is added security when a user in one organization cannot see anything in another organization. All data is secure within the organization and cannot cross organizations.
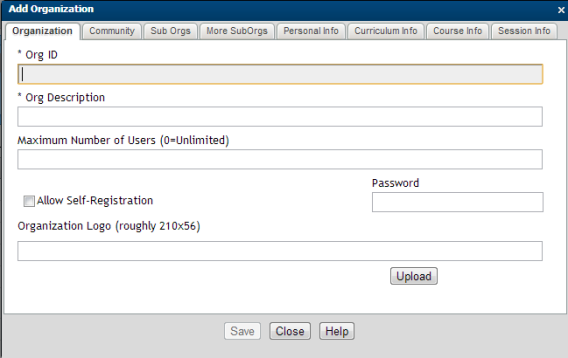
After logging in as an administrator, use the Add Organization button on the Manage Orgs tab to add a new organization to your CourseMill system. When adding an organization, you will define the following organization details by filling in data in various tabs.
|
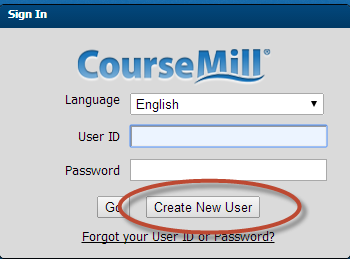
Org ID – the unique identifier - with no spaces - for the organization as it will be known within the system. Org Description - a more detailed description for this organization. Maximum number of users – The maximum # of users you are licensed to have. You might want to set this a little less than your license to give you enough warning to renew with a larger license. If you have an unlimited license, enter zero. Allow Self-Registration – If checked, students will be able to self-register (with or without an access code) and set up their own UserID. See login screen below. If unchecked, an administrator will need to set up all User IDs or import them. Logo – An uploaded logo will appear in the top left corner of the User Interface. Click Upload to browse for the logo file. Be sure your pixel size will fit within the 210 by 56 size. |
|
If users are allowed to register themselves, they will see this screen. There are also ways to automatically import users and integrate with Active Directory and HRIS systems. See Batch Managing User Data. |

|
Chat Support – Specify if you want to use CourseMill’s internal Chat room IM Support - Specify if you want to use CourseMill’s internal Instant Messenger Discussion Board Support – Specify if you want to use CourseMill’s internal discussion board or if you want to point to an external board using its URL. Email Support – Specify if you want to use CourseMill’s internal Email system or if you want to use your organization’s external email.
|
Allow Student to Student Email in the Discussion Board – Enable this to allow students to send emails to anyone who has posted to their organization bulletin board posting if you are using discussion boards.
News URL – Specify a Web page that all users within that organization will see as their news page.
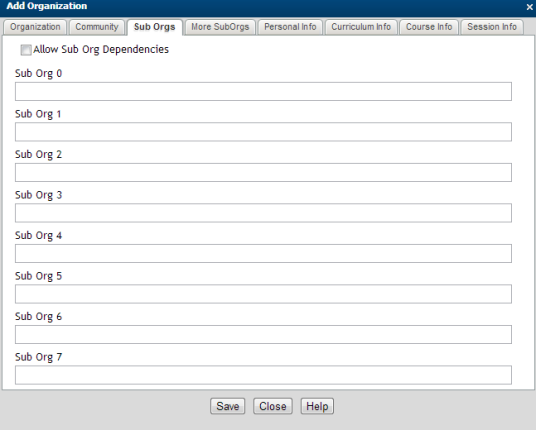
In addition to the organization that you have set up, you can also further define organizations by setting up to 16 Sub-Orgs (0 to 7 on the first tab, and 8-15 on the second tab). Creating and defining sub-orgs enables you to categorize the various users inside an organization. For example, you may want to categorize the users in your system by Division, Region, Department, Geographical Location, Job Title, or some other category based on the overall structure of the users in the system. Making use of sub-organizations to further define categories of users has its advantages:
You can generate reports with data pertaining to a specific sub-org category of users.
You can assign courses and curriculums to entire groups of people, using the sub-org selection.
Administrators and instructors can easily generate emails addressed to an entire sub-org group.
|
Sub Org 0 through Sub Org 7 - Specify the title of each Sub Org that you want to specify. Sub Org 8 through Sub Org 15 – On the next tab, More Sub-Orgs, specify the title of each Sub Org that you want to specify.
|

|
In the example depicted to the left, if the user’s profile indicates that the user belongs to the Marketing Department, then he or she can further belong only to the Print, Social, or Web Teams. |
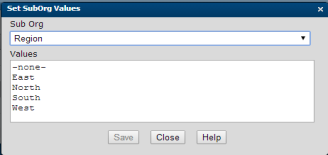
In the Manage Orgs section, the administrator will define your values for each Sub Org by pressing the Set SubOrg Values button on the top navigation pane. Select each Sub Org level you have defined by using the drop-down arrow, and fill in the multiple values that will be available to each user.

|
|
Sub Org values can automatically be created if you are using the import data process to load users. For the manage properties category of Import Options, set the property AddSubOrgValuesOnImport to Yes to load values in the validation tables. Do not leave an organizational category Sub-Org value blank. Always enter a value, like -None-, so the import process will load additional values.
Similar to the above process, you can also clean up your existing sub-org table by using data already in your user records. Note that this cannot be done if your Sub-Org table is set up for dependency.
If you are interested in doing this, you need to do the following:
Go to Manage Orgs and bring up each defined Sub-Org and clear out all values except for one value of -None-.
Go to Manage Properties and be sure the property of AddSubOrgValuesOnImport is set to Yes. If it is not, change it to Yes and be sure to select the Apply Changes button to finalize the change.
Go to Manage Scheduled Tasks and either manually run Database Maintenance or just let it run overnight. This job will update your Sub-Org table values with the values that are in each student record.
Determine if you still want to have the AddSubOrgValuesOnImport property set to Yes – update accordingly.
See Working with LDAP and SSO for integrated creation and update of users with internal systems. Be aware you can use LDAP (Lightweight Directory Access Protocol) or SSO (Single Sign-on) in conjunction with the automated import process.
|
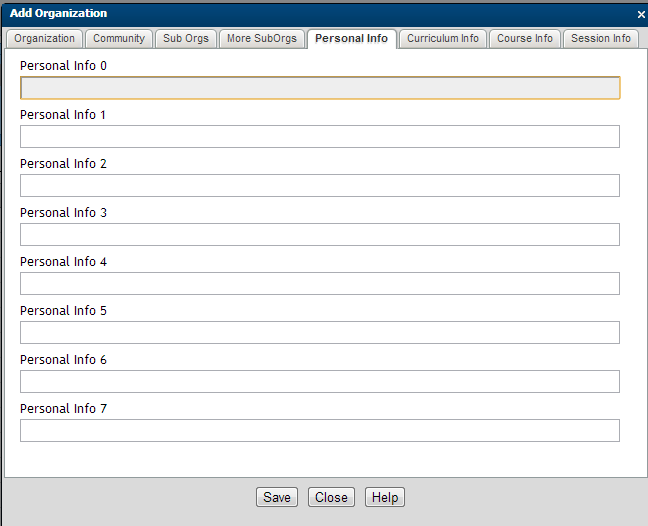
Personal Info 0 through Personal Info 7 Specify up to eight custom user fields for tracking additional information on a user. For example, you may want to list a cell phone number or emergency contact for a user. These fields can be used in custom reports that you generate. These fields are not available as filters for enrollment selection. However, they may be shown in standard reports by simply filling in a check box. |
|
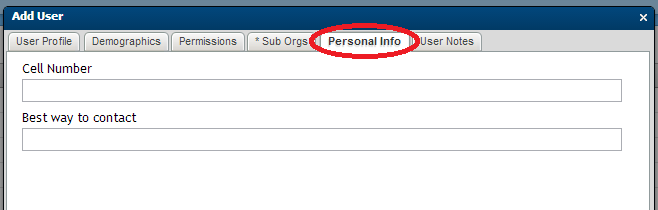
Only when you add a field item in the above Organization screen, will the system add a tab on the Add User page where the value of that item can then be entered. |
|
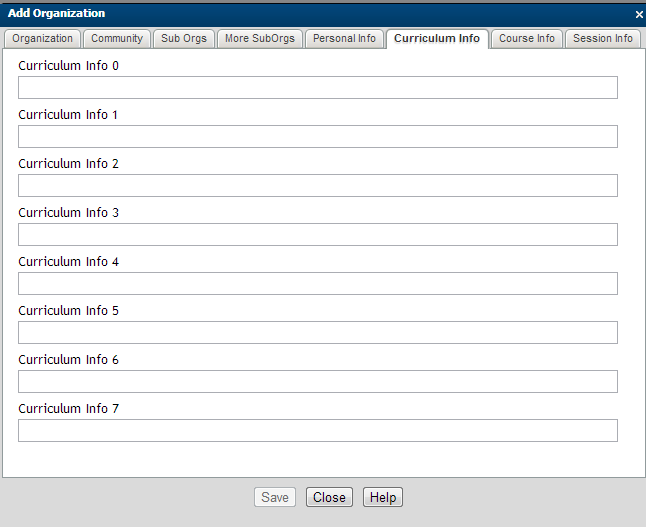
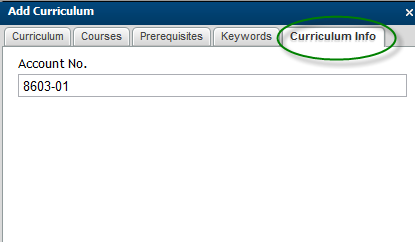
Curriculum Info 0 through Curriculum Info 7 - Specify up to eight custom user fields for tracking each curriculum. For example, you may want to assign an account code to a curriculum for revenue tracking. These fields can be used in custom reports that you generate. These fields are not available as filters for enrollment selection or in standard reporting. |
|
Only when you add a field item in the above Organization screen, will the system add a tab on the Add Curriculum screen where the value of that item can then be entered. |
|
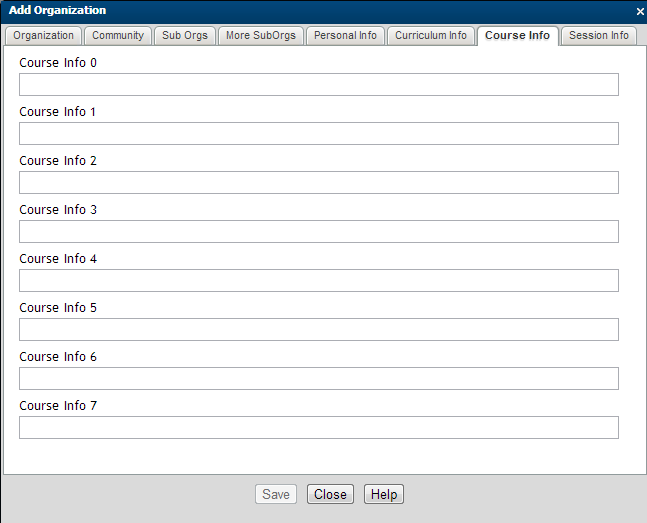
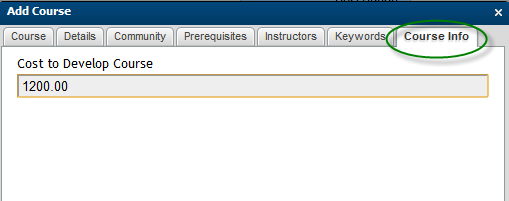
Course Info 0 through Course Info 7 Specify up to eight custom user fields for tracking each course. For example, you may want to assign a cost to a course to track the return on investment. These fields can be used in custom reports that you generate. These fields are not available as filters for enrollment selection or in standard reporting. |
|
Only when you add a field item in the above organization screen, will the system add a tab on the Add Course dialog where the value of that item can then be entered. |
|
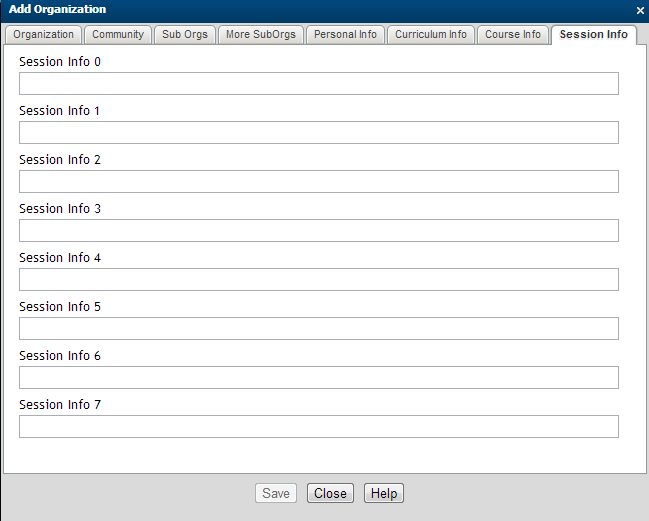
Session Info 0 through Session Info 7 Specify up to eight custom user fields for tracking each session. For example, you may want to track the city where this session is being held to see where you have the most student enrollment. These fields can be used in custom reports that you generate. These fields are not available as filters for enrollment selection or in standard reporting. |
|
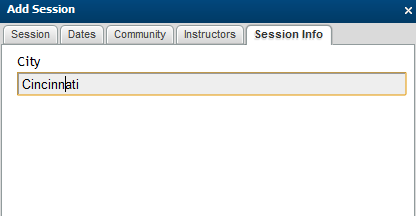
Only when you add a field item in the above organization screen will the system add a tab on the Add Session dialog where the value of that item can then be entered. |
When creating multiple organizations that have very similar details, the Duplicate Organization function can be utilized to copy all of the information of the current organization to the new Org ID.
To perform the duplicate organization function, the following would be performed:
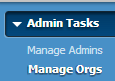
From the left sidebar menu, expand Admin Tasks and click Manage Orgs.
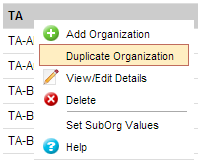
Right-click the organization you want to duplicate. In this example, the organization to duplicate is TA; select Duplicate Organization.
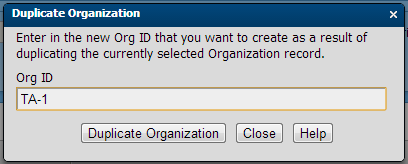
The new Org ID is defaulted to the original Org ID with a -1 appended to make it unique. Replace the defaulted Org ID value and then select the Duplicate Organization button. This will copy curriculums, courses, sessions, notifications, and certificates from the original Org ID to the new Org ID. No students will be copied.
All information for the new Org ID will need to be reviewed and modified (for example. organization description). To do this, right-click the Org ID just created and select the option View/Edit Details, or select the View/Edit Details button along the top of the screen.
|
|
This option is only available to the administrator role. |
© Copyright Trivantis Corporation 2015