
Each function requires an import file to drive the process. The source of this input could come from various places, such as, your HRIS system, manual input, or data from a CourseMill report that you previously ran.
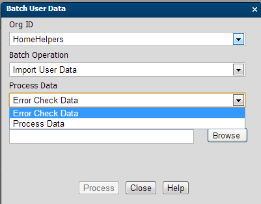
The file must be formatted as a tab-delimited text file (.txt or .csv). Before actual processing of the file, you can run an error check to verify that the file is properly formatted.
This document concentrates on the tab-delimited text file. For further instruction on LDAP, see Working with LDAP and SS0.
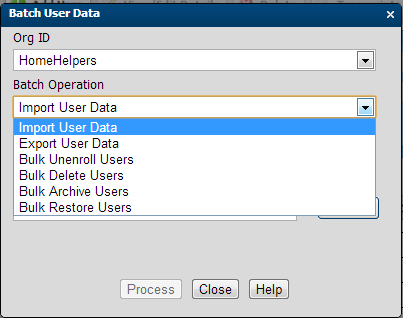
Let’s review in more detail the six types of batch operations that are available.
You can add new user accounts by importing users from a file that contains the entire user’s profile data.
Once added, you can also update existing users using the same import approach. Based on the fields that are available to import, you can also do the following:
Bulk Enroll students in a course, curriculum, or session.
Bulk grade a set of students with a score or completion status
Inactivate a mass number of users
You can download user data to a text file (.txt) that you can save and open from your desktop. Once CourseMill displays the data on your screen, click Save Page As from your toolbar and save it as the text (.txt) file. You can then open it with Excel by designating it as a tab delimited file in order for it to display properly.
This allows you to easily make mass changes to your user population (by changing values in the excel file) and then uploading them back in by using the Import User Data operation.
You can unenroll users from a course/curriculum by importing users from a file that contains the course/curriculums that you want to unenroll them from. This is typically only used when you have mistakenly enrolled them in a course or curriculum.
You can delete users in mass by importing a file with the user IDs you wish to delete. Deleting users will completely erase all history of the students. Deactivating the users and then archiving them is recommended.
You can bulk archive users in mass by importing a file with the users you wish to archive. If you archive students, they will not appear on any lists within your interface. However, there is now a new general report called List of Archived Students.

|
There are two other reports that will allow you to select from archived students. These are the Transcript Report and the Completions Report. Both have check boxes where you can select this option. For further documentation on reporting, see Reporting. |
You can bulk restore users in mass by importing a file with the user IDs you wish to restore. It will restore the users back to whatever state (active/inactive) they were archived in.
|
|
When a user is restored that is in a SubOrg which is tied to a course or curriculum which automatically enrolls a student, the student will not be automatically enrolled in a course at the time they are restored, but they will get enrolled when the evening batch job runs. |
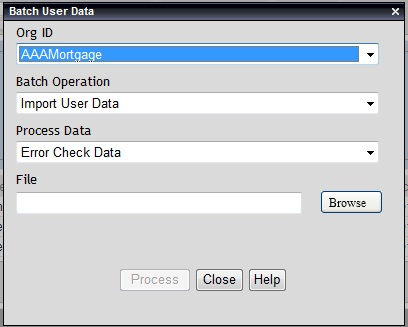
Anyone who has been given rights to import user data (admin, instructor, or reporter) can follow these steps to process the tab-delimited file.
Open Manage Users on the left navigation pane and click Batch User Data button. The dialog box (below) opens.
|
The Error Check and the Process Data will display the number of errors encountered or records added.
|
Data items must be separated by Tabs (a tab-delimited file)
Each row represents one user
The first row must contain field names used to locate the corresponding columns within the data. The order of the fields is not important.
If a header field name in the import file does not match one of the first four CourseMill column names as shown below – you will get an error. If it does not match any of the others, you will not get an error message and the field will not be updated.
Mandatory fields are marked with red ‘Y‘, Highly Recommended Fields are marked a green ‘Y’, optional Fields are marked with ‘Y’
|
Column name |
Description |
User ImportBulk Add or Mod |
User ImportBulk Enroll |
Bulk Unenroll |
User Import Bulk Grade |
Bulk Archive or Restore |
Bulk Delete |
Bulk Export |
||||||||||||||
|---|---|---|---|---|---|---|---|---|---|---|---|---|---|---|---|---|---|---|---|---|---|---|
|
OrgID |
The user's organization * |
Y | Y | Y | Y | Y | Y | Y | ||||||||||||||
|
ID (or StudentID) |
The user's user ID * |
Y | Y | Y | Y | Y | Y | Y | ||||||||||||||
|
LastName |
The user's last name * |
Y | Y | Y | Y | Y | Y | Y | ||||||||||||||
|
FirstName |
The user's first name * |
Y | Y | Y | Y | Y | Y | Y | ||||||||||||||
|
Password |
The user's password – when importing a user for the first time, you can create a password by supplying this field. If you do not supply this field in the import file, the default password (manage property ImportDefaultPassword will be inserted as the user’s password. On export, CourseMill will provide a field for the password but does not insert it in that field.
|
Y |
Y |
|||||||||||||||||||
|
PasswordResetType |
Specifies what type of password changing restrictions are allowed. Options are:
|
Y |
Y | |||||||||||||||||||
| EmailID | The user's email address | Y | Y | |||||||||||||||||||
| MiddleInitial | The user's middle initial | Y | Y | |||||||||||||||||||
| Address | The user's address | Y | Y | |||||||||||||||||||
| City | The user's city | Y | Y | |||||||||||||||||||
| State | The user's state | Y | Y | |||||||||||||||||||
| Zip | The user's zip | Y | Y | |||||||||||||||||||
| Country | The user's country | Y | Y | |||||||||||||||||||
| Phone | The user's phone | Y | Y | |||||||||||||||||||
| HireDate | Date yyyy-mm-dd format. On export, it may also insert a time into the field depending on what type of database you are using. | Y | Y | |||||||||||||||||||
| LangPref |
The language preferred by the User. Values are:
|
Y | Y | |||||||||||||||||||
| SubOrg0-15 | Values for the custom fields that were defined when the organization was added. For detailed information about defining Sub-Org fields, see Adding an Organization in the Help. | Y | Y | |||||||||||||||||||
| GuestFlag |
Is user a Guest? Values can be:
There really is no need to ever import a guest as you will typically only have one, at most. Once a user is set to Guest, it can never be changed to anything else. If a user is already a reporter or instructor, it can’t be changed to a guest.
|
Y | Y | |||||||||||||||||||
| InstructorFlag | Is user a instructor? Values can be:
|
Y | Y | |||||||||||||||||||
| ReporterFlag | Is user a reporter? Values can be:
|
Y | Y | |||||||||||||||||||
| TermsOfUseAccept | Date user accepted the Terms of Use if your organization is using this. Depending on the database you are using the time might also be exported. | Y | Y | |||||||||||||||||||
| PersonalInfo0-15 | Values for the custom fields that were defined when the organization was added. For detailed information about defining Sub-Org fields, see Adding an Organization in the Help. | Y | Y | |||||||||||||||||||
| CurrPermissions |
Permission given to update curriculums: If allowing more than 1 value, separate with commas.
|
Y | Y | |||||||||||||||||||
| CoursePermissions | Permission given to update courses: If allowing
more than 1 value, separate with commas.
|
Y | Y | |||||||||||||||||||
| UserPermissions |
Permission given to update users: If allowing more than 1 value, separate with commas.
|
Y | Y | |||||||||||||||||||
| ActiveFlag | Is user active? Values can be:
|
Y | Y | |||||||||||||||||||
| ReportsTo | The user ID of their reporter | Y | Y | |||||||||||||||||||
| UserNotes | Notes to be associated with the user | Y | Y | |||||||||||||||||||
| CurrID | Curriculum into which the student should be enrolled or un-enrolled. | Y | Y | Y | ||||||||||||||||||
| CourseID | CourseID of the course into which the user
should be enrolled or un-enrolled.
|
Y | Y | Y | ||||||||||||||||||
| SessionID | SessionID of the session into which the user should be enrolled or un-enrolled | Y | Y | Y | ||||||||||||||||||
| EnrollDate | Enrollment date (yyyy-mm-dd) for course/curr | Y | ||||||||||||||||||||
| PassDate | Pass Date (yyyy-mm-dd) for the course/curr | Y | ||||||||||||||||||||
| CourseStatus |
Any valid SCORM course status (including blank), such as:
|
Y | ||||||||||||||||||||
| Score | The score a user received in a session or course (not a curriculum). (0-100) | Y | ||||||||||||||||||||
| Comment |
The comment for reason of grade change in the Gradebook as to why you changed the grade. |
Y |
|
OrgID |
ID |
Password |
LastName |
FirstName |
EmailID |
SubOrg0 |
|---|---|---|---|---|---|---|
|
TestOrg |
lpra1234 |
cotton |
Prather |
Linda |
Midwest |
Register a student to Curriculum/Course/Session
|
OrgID |
ID |
LastName |
FirstName |
CurrID |
CourseID |
SessionID | EnrollDate |
|
TestOrg |
lpra1234 |
Prather |
Linda |
HistoryCurr100 |
History101 |
567 | 2012-04-01 |
Pass a student on Curriculum/Course/Session
|
OrgID |
ID |
LastName |
FirstName |
CourseID |
SessionID |
PassDate |
CourseStatus | Score |
|
TestOrg |
lpra1234 |
Prather |
Linda |
History101 |
567 |
2012-06-30 |
Completed | 97 |
Bulk Un-Enroll
|
OrgID |
ID |
LastName |
FirstName |
CurrID |
CourseID |
SessionID |
|
TestOrg |
lpra1234 |
Prather |
Linda |
HistoryCurr100 |
History101 |
567 |
Bulk Delete or Archive/Restore
|
OrgID |
ID |
LastName |
FirstName |
|
TestOrg |
lpra1234 |
Prather |
Linda |
|
|
|
Historical student completion records from another LMS can be imported into CourseMill. Here are some points to consider.
Be sure all users already exist in CourseMill. For those users not currently in CourseMill (both active and inactive), load them into CourseMill with as much information as possible (suborg values, personal information if any, demographics such as address, etc.) prior to importing any of their historical course data.
Be sure the course ids and content already exists in CourseMill. If they do not, you will have to create the courses prior to importing any of the historical course completion data. Each course must have at least one content item (this could be as simple as a Graded-No-Content attendance record)
|
|
If any of the courses have due dates and/or re-enrollment days, the recommendation is to turn them off (remove) prior to the historical data import. Once that is done, proceed with the following steps. |
Import the student’s historical course enrollments first, using the old enrollment date (courses must already exist in CourseMill). Performing the enrollments first is a good way to ensure the data was created as expected. This file can then be used as a template to perform the next step importing the completions statuses, pass dates and scores.
|
|
Be sure the course enrollment notification is turned off so the emails do not go out for this history. Check all other notifications as well. |
Next, import the student’s historical course completion statuses, pass date and scores.
|
|
.When importing historical records with students that have multiple completion statuses for a single course (a repeated course over a period of time), import with the oldest record to newest. |
If a course previously had Due Dates or re-enrollment days, you can now put them back in (turn on) on the appropriate courses. The next time the user logs in the due date will get calculated on the newest course completion record.
|
|
.Warning: Failure to remove due dates on a course prior to importing the historical data will result in incorrect data entered in the expiration date. Incorrect ordering for the same Course ID:
Correct ordering for the same Course ID:
|
A batch import can also be used in merging two students into one. To do this, use the following file format:
| OrgID | StudentID | LastName | FirstName | MergeOldID |
| TestOrg | lpra5678 | Prather |
Linda |
lpra1234 |
StudentID – Represents the resulting student ID (the student ID you want to keep).
LastName – Represents the resulting last name of the student.
FirstName – Represents the resulting first name of the student.
MergeOldID – The old student ID and all its data that you wish to merge into the student ID you are keeping.
An import file can be loaded on an automatically scheduled timeframe that is suitable to your needs. Once the file has been completed and tested, it can be submitted to the CourseMill scheduler to process on a nightly basis.If the import file is coming from another system (like an HRIS or ERP system), the admin will need to perform two (2) tasks:
| Manage Property | Description | Values |
|---|---|---|
|
AddSubOrgValuesOnImport |
Specifies whether new valid SubOrg Values are added from the import file. Note:Each SubOrg value must have at least one value added before running the import for this to execute. “–None-“ is recommended. |
0 - Prevent importing new valid SubOrg Values (default) or “No”. 1 - Allow importing new valid SubOrg Values or “Yes”. |
|
ForceSubOrgValues |
Specifies whether the SubOrg values in the user profile are required (true) or optional (false) when using the scheduled import. |
0 (false) [default] 1 (true) |
|
ImportFileName |
Specifies the full path to the import file to be processed and deleted. |
|
|
ImportDefaultEmail |
Specifies the default email when importing students if the email is not supplied in the file. |
|
|
ImportDefaultPassword |
Specifies the default password when importing students if the password is not supplied in the file. |
PASSWORD is the default |
|
ImportEmailResults |
Specifies whether the results of the scheduled import are automatically emailed to the system administrator. |
1 = Yes – email (default) 0 = Do not email |
|
ImportPostCmd |
Specifies an optional command file/script that will be run on the server after successfully importing the import file. |
|
|
ImportPreCmd |
Specifies an optional command file/script that will be run on the server prior to importing the file. This allows for either a pre-decrypting of the import file or a database backup/extract to be performed before the import is conducted. |
|
|
ImportSchedule |
Specifies when bulk imports are to run. This value is set for you when you select a schedule in Manage Scheduled Tasks |
0 0 4 ? * SUN (Every Sunday at 4AM/default) |
|
|
After modifying any Manage Properties option, make sure to click the Apply Changes button in order to apply the changes to the system. |
The admin will need to schedule the import by clicking on Admin Tasks > Manage Scheduled Tasks as shown below.
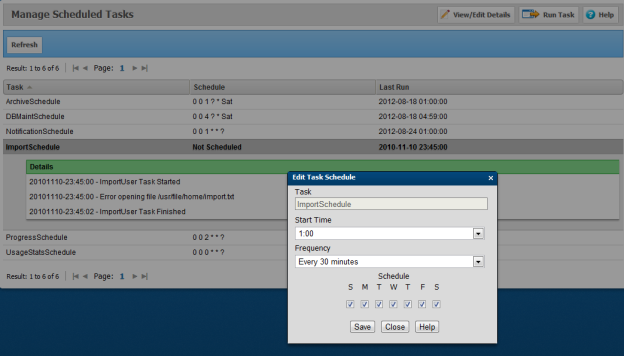
Once the file has been tested and run once to ensure proper processing, it can be submitted to the CourseMill scheduler to process on a nightly basis. If using the CourseMill hosting services, an SFTP username and password will be provided to allow you to upload the file on a scheduled basis. Please contact your Account Rep or Trivantis Support (support@trivantis.com) to request these credentials.
Multiple import files are permitted each day. The CourseMill scheduler will need to be aware of the incoming files so it can process each independently. To set the scheduler, review the functionality in Admin Tasks -> Manage Scheduled Tasks.
Data loads are cumulative, so each time the load file is received from the host system, CourseMill will match the ID, FirstName and LastName then overwrite the information from the import file. CourseMill does not save an audit trail of the data prior to each load.
|
|
|
© Copyright Trivantis Corporation 2015